Saturday, March 24

Natural Cherry Crispy Treats

A few months ago a good friend of mine made a new type of Rice Krispies Treat using more natural ingredients than Kellogg’s famed version.    I know exactly what you’re thinking…they can’t possibly taste as good.  WRONG!  When people think of healthy ingredients they often associate them with a bland taste.   Trust me, try this recipe will squash those myths and have you hooked.  I used to love Rice Krispies Treats and all their varieties (especially peanut butter flavored!), but now I can honestly say I will NEVER make them again.  These Natural 
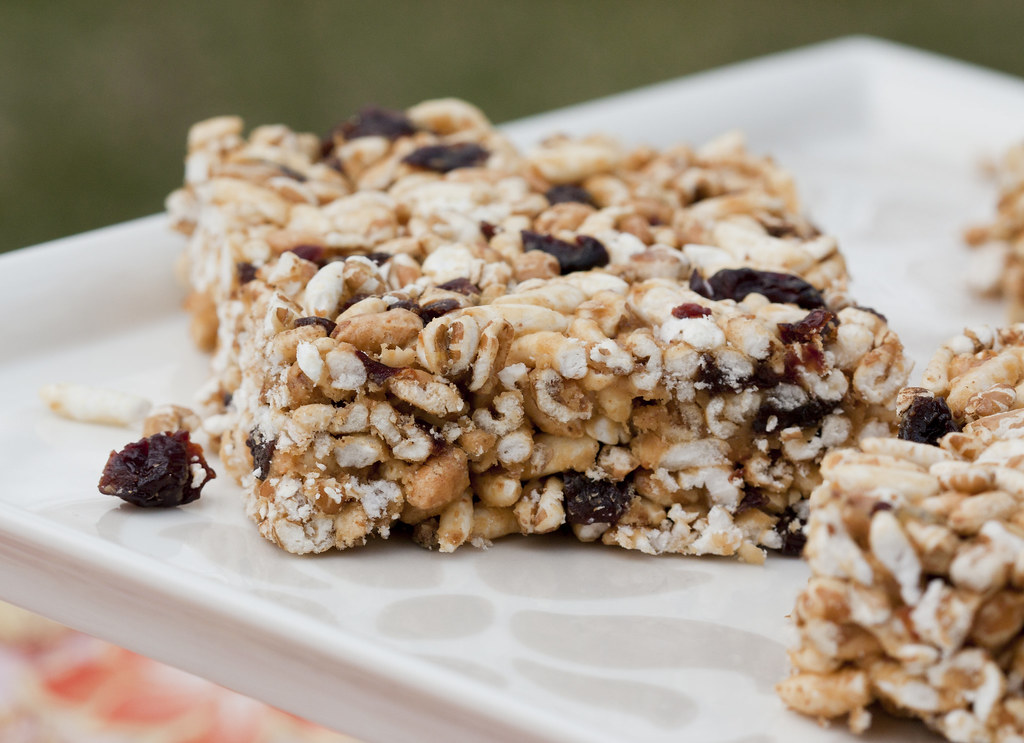
Cherry Crispy Treats are so tasty that they put traditional Rice Krispies Treats to shame.

Butter and a whole bag of marshmallows are the key ingredients within Kellogg’s Rice Krispies Treats .  Natural Cherry Crispy Treats, on the other 
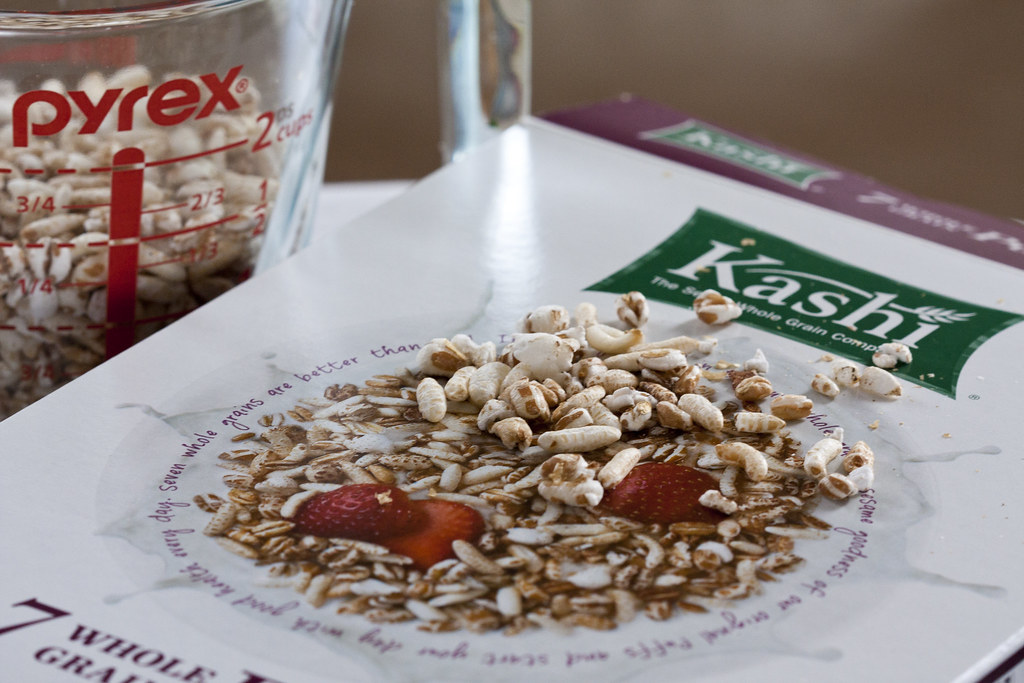
hand, are prepared with natural peanut butter, honey, and dried cherries.  They also use Kashi 7 Whole Grains cereal instead.  What’s great about Kashi 7 Whole Grains cereal is that it contains no added sugar and a whopping 18 grams of whole grains!  It also has a variety of puffs, flakes, and nuggets which give Natural Cherry Crispy Treats an irresistible texture.


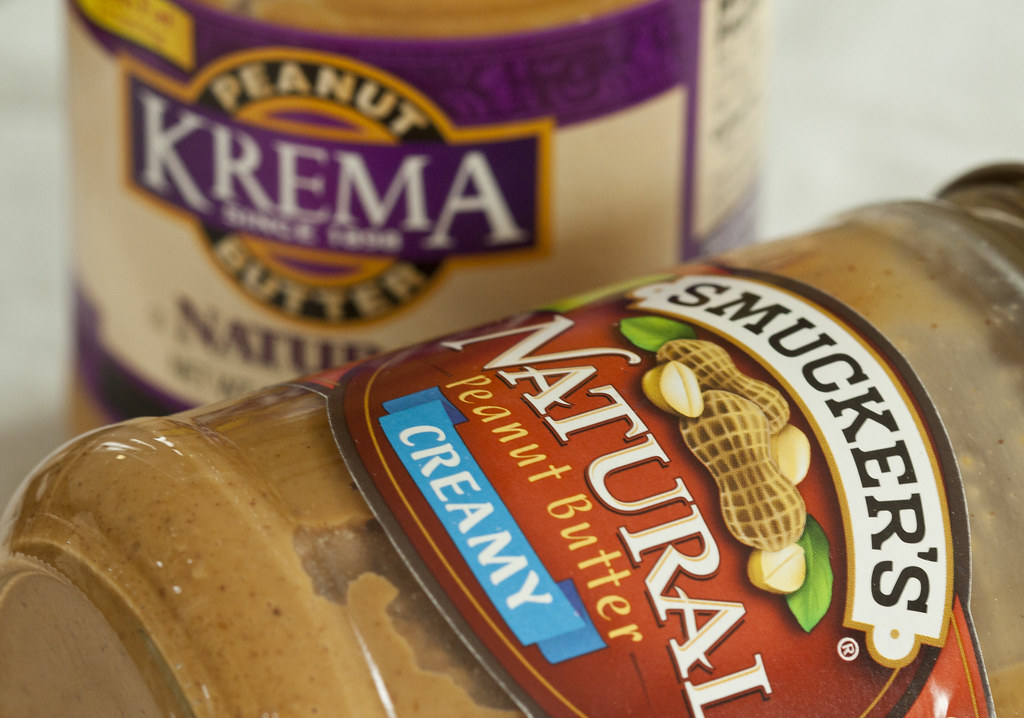
There’s one suggestion I’d like to make, before you begin, and that’s to buy natural peanut butter.  You may very well have a typical brand at home such as Jiff, but natural peanut butter is a million times better.  I tried natural peanut butter for the first time, shortly before discovering this recipe, and was utterly amazed by the taste.  I had ignored natural peanut butters at the store because the top portion of the jar was filled with liquid.  I thought it looked odd and unappetizing.  Since the oils naturally separate, all that’s needed after opening a jar of natural peanut butter is to stir the mixture with a knife until everything has been equally distributed.  There are a variety of brands to choose from, but my personal favorites are any of Trader Joe’s or Krema.  Even Smucker’s produces natural peanut butter.  See what selections your grocery store has to offer!


After the first time I made these bars, my husband and I were addicted.   Since we recently started eating healthy, these serve as a sweet snack (or dessert!) that doesn’t sabotage our calorie count for the day (163 calories per serving).   And the best part about making Natural Cherry Crispy Treats………no more messy marshmallow clean up!


Natural Cherry Crispy Treats
Serves 12 (1 serving = 2.5 x 3 in. square)
Prep Time: 10 minutes.
Total Time:  40 minutes (includes 30 minutes of cooling)

Ingredients:
  • 1/2 cup honey
  • 1/2 cup natural peanut butter
  • 6 cups Kashi 7 Whole Grains cereal
  • 2/3 cup dried cherries, chopped
  • non stick cooking spray
  • wax paper

Directions:
  1. Spray a 9x13 inch cake pan with non stick cooking spray.  Set aside.
  2. In a large mixing bowl add cereal and chopped cherries.  Set aside.
  3. In a small pot, over low-medium heat, combine honey and peanut butter.  Stir until completely melted (approximately 2-3 minutes).
  4. Add honey-peanut butter mixture to the large mixing bowl.  Using a large spoon, mix and stir the ingredients until cereal is fully coated; equally distribute the mixture.
  5. Pour mixture into the prepared pan and evenly spread across.  Place a large piece of wax paper on top, fully covering the pan.  Using hands or a smaller rectangular baking pan, firmly press the mixture into the pan.  This will flatten the mixture and as well as help keep its form.
  6. Place in the refrigerator for 30 minutes before cutting and serving.  Note:  In the summer  I keep these stored in the refrigerator as they’re nice and refreshing when served cold.


Sunday, March 18

Salmon with Mango Kiwi Salsa

Recently I’ve come across a new website called myrecipes.com.  It features recipes from one of my favorite magazines (Cooking Light).  That’s where I found the salmon recipe below.  Remember, if you’re not fond of salmon, I still encourage you to try it or one of my other salmon recipes:  Dry-Rubbed Salmon with Cucumber Relish, Salmon with Honey Mustard Glaze, or Chili Garlic Glazed Salmon.  The reason being that my husband always used to say he did not care for salmon.  He said what many others say…‘it has a fishy taste’.  Well, that perception changed when I started cooking it at home, since it’s my favorite fish!  I think the key to introducing salmon to someone is by preparing it many different ways.  Some recipes may have a sweet taste, while others spicy, etc.  Through experimentation with many meals my husband now LOVES salmon.  That’s why I was excited to try out this recipe; just another possibility.

Because we eat salmon quite often (2 to 3 times per week), I make things easier on myself by buying a large fillet of salmon (2-3 lbs) on the weekend and cutting it into 6 oz. serving sizes.  Then I place 2 fillets in a Ziploc bag (quart size works perfectly) and freeze them.  When I know we’re going to make salmon I simply pull a bag out of the freezer, the night before, and let it thaw in the fridge.  Now our house is always conveniently stocked with salmon.  It can’t get any easier than that! 

The below recipe is quite simple and what I like is that you have the option to cook it in a skillet or bake it in the oven.  With summer quickly approaching, you can easily grill it as well!  Before you begin chopping and assembling the salsa, watch the following video links to learn how to easily peel kiwi and quickly dice mangoes.  Trust me, you’ll save yourself time.

Juicy Mangoes!

Fresh Cilantro!  My favorite herb!

Mango Kiwi Salsa - DELISH!

When the fillets came out of the oven, they looked delicious!  For the finishing touch I topped them with the mango kiwi salsa as well as served some on the side each.   When looking at the completed dish, you’d swear it came right out of a seafood restaurant.  It’s hard to believe that an elegant dish like this can be so easily prepared at home.  We couldn’t wait to dig in!  The salmon tasted wonderful.  It had a nice, sweet taste while the salsa tasted light and refreshing.  With every bite we couldn’t help but think summer is right around the corner.  


Salmon with Mango Kiwi Salsa
Serves: 2
Prep Time: 20 mins.
Total Time: 32 mins.

Ingredients:

Salmon-Marinade:

  • 1 tablespoon honey
  • 2 teaspoons low-sodium soy sauce
  • 1 teaspoon olive oil
  • 1/4 teaspoon black pepper
  • 2  (6 oz.) salmon fillets
  • Non Stick Cooking spray


Mango Kiwi Salsa:
  • 1/2 cup peeled mango, diced
  • 1/2 cup peeled kiwifruit, cubed
  • 1/4 cup fresh cilantro, chopped
  • 1/4 cup orange juice


Directions:
  1. In a small bowl, combine all marinade ingredients (except for cooking spray).  Mix thoroughly; pour into a medium sized Ziploc bag.  Note: If choosing the option to bake fillets, pre-heat oven to 400˚F.
  2. Add salmon fillets to Ziploc bag; seal and place in the refrigerator. Marinate for 10 minutes (or longer if desired); turn occasionally.
  3. While fish marinates, assemble salsa.  Combine all ingredients; stir well.  Place in refrigerator. 
  4. Remove fish from Ziploc bag; discard marinade.
  5. Cook in a skillet (option A) or bake in the oven (option B).  Follow accordingly:

    Option A:  Lightly coat a large skillet or grill pan with non stick cooking spray. Add fish; cook 5 minutes on each side or until the fish flakes easily when tested with a fork.  

    Option B:
      Lightly coat a baking sheet with non stick cooking spray.  Bake at 400˚F for 10-12 minutes or until the fish flakes easily when tested with a fork.  

  6. Top fillets with mango kiwi salsa as well as serve on the side.  Serve and enjoy!


Sunday, March 11

Brussels Sprouts with Carrots & Almonds

Many times I find myself deciding what type of side dish to make with dinner.  With summer quickly approaching, as well as my birthday (the big THREE O), my husband and I have vowed to eat healthier and exercise more.  This helps narrow our selection.  Or maybe ‘narrow’ isn’t the right word.  I’ve found that you can eat a lot of vegetables for not very many calories at all.  I guess you could say this is a learning experience and has opened new doors for me.  There are so many vegetables we’ve never tried.  For instance Brussels sprouts.

I know what you’re thinking….yuck!  Isn’t that the vegetable that everyone despises?  The one that causes kids to turn their noses up in disgust?  Yes, that’s the one I’m talking about.   I thought those same exact things myself.  Actually, I’m not quite sure why I didn’t move onto the next recipe when I stumbled across this one.  Ohhh I remember what caught my attention.  One serving size of this dish is only 84 calories.


I decided to give Brussels sprouts a try.  Okay, I admit I wasn’t brave enough to eat them alone. I enjoy carrots and almonds which is why I thought this recipe would be perfect for easing me into Brussels sprouts.  Plus, as I searched online, I learned that Brussels sprouts offer some great health benefits.  Not only do Brussels sprouts help lower cholesterol, but they also help fight against cancer and even prevent some forms of cancer.  What else?  They are extremely high in Vitamin K (one cup contains 273.5% of the recommended dietary allowance).  They’re also a great source of Vitamin C (one cup contains over 161% of the recommended dietary allowance).  


With all of the above health benefits, how could we go wrong with this dish?  I made it to go along with one of our favorite salmon dinners (Honey Mustard Glazed Salmon) and we were quite surprised.  Never having experienced Brussels sprouts, we felt they tasted very similar to cooked broccoli.  The carrots, almonds, and tad bit of brown sugar really pulled this side dish together by creating an ever so faint sweet taste.  The verdict: give Brussels sprouts a try!


Brussels Sprouts with Carrots & Almonds
Servings:  4
Prep Time:  10 mins.
Total Time:  20 mins.

Ingredients:

  • 1 tablespoon butter
  • 1 1/2 cups (2 inch) julienne-cut carrot
  • 3 cups Brussels sprouts, quartered
  • 2 tablespoons fresh parsley, minced
  • 1 tablespoon sliced almonds, toasted
  • 1 teaspoon brown sugar
  • 1/4 teaspoon salt
  • 1/8 teaspoon black pepper


Directions:

  1. In a large nonstick skillet melt butter over medium heat. Add carrots; sauté 4 minutes.
  2. Add Brussels sprouts; sauté 5 minutes or until crisp-tender.
  3. Add parsley, almonds, brown sugar, salt, and pepper.  Stirring constantly, cook until    the sugar melts (approximately 30 seconds).


Saturday, March 3

Mushroom & Green Bean Risotto

This past weekend marks a very special date for me.   Exactly one year ago today I created Red Lab 27.  I always thought it would be fun to have a blog, but I never knew what to write about.  Luckily at that time there were many new changes happening in my life.  My new job brought me a different city to explore and eventually I stumbled upon the local library.  Checking out cookbooks was much more fun than buying them, plus there was an endless supply.  With all the new dishes I was making, I finally had a subject to write about.  As an added benefit, I knew that if I had my own blog, my tech savvy husband would be so proud. 

Trying a new recipe each week and blogging about it has become a true passion of mine.  Because of Red Lab 27, I’ve made new connections and friends.  I can’t begin to explain how rewarding it is when followers I don’t know leave comments on my site about a recipe they’ve tried!    More than anything I love inspiring people to cook.  You don’t have to be a professional chef to produce amazing dishes at home.  I’m by no means a pro, but in the eyes of my husband I am, and that’s what counts!

For Red Lab 27’s one year anniversary I wanted to make one of my favorite dishes.  But which one?!  That’s when I realized I hadn’t shared this recipe for Mushroom & Green Bean Risotto!  If you’ve never tried Risotto it’s a popular Italian dish made of rice, that’s cooked in broth, to a creamy consistency. Y-U-M! 

Please be forewarned that this dish takes time.  It’s not hard, it just takes patience.  At the very end you’ll find yourself standing by the stove, stirring for a half hour, as the broth is slowly absorbed into the rice mixture.  The original directions say to stir constantly.  What?!  The first time I made this meal I stirred and stirred for the full half hour (no breaks!).  However, the 2nd time around I stirred for a minute, put some dishes away, and continued stirring with little breaks in between.  This worked just as well and didn’t affect the taste.

Fresh green beans and mushrooms

Before you begin this dish, you may be wondering where to find a few of the ingredients.  Dried porcini mushrooms can be found in the produce section of your grocery store.  Dried mushrooms are typically kept refrigerated, near the fresh mushrooms.   I had to spend some time searching for the short-grain rice.  Who knew there were so many kinds of rice lengths!  But it’s very important to buy short-grain rice, as it easily absorbs liquid and will cook more quickly.  I used gluten free, Lundberg Short Grain Brown Rice.  Also, do not cheat and buy Kraft Parmesan Cheese.  Buy real Parmigiano-Reggiano cheese and grate it yourself.  Freshly grated Parmigiano-Reggiano is absolutely amazing!  There's no comparison.  Trust me, if you put in the effort to make this dish, you want to properly finish it.  This cheese is a little more expensive (approx. $10 for a block) and can be found near the fine cheeses.

Soaking the dried porcini mushrooms

This dish is sinfully delicious and has become one of our regulars now.  My husband described it as a “techno party” in his mouth.  While I was taking the pictures for my blog, we couldn’t contain ourselves and were sneaking bites here and there, until the photos were done.  When you take your first bite, your heart will melt and you’ll feel as if you’re dining at an exquisite Italian restaurant.  Also, did I mention that this dish is healthy too?!  Cooking Light provided the nutritional value of 434 calories in one serving (1 ¾ cup).  What a great dinner option! Enjoy!


Mushroom & Green Bean Risotto
Serves 4
Prep Time: 45 mins.
Total Time: 1 hour 5 mins.

Ingredients:

  • 1 1/2 teaspoons kosher salt, divided
  • 1 cup short-grain brown rice
  • 1/2 cup dried porcini mushrooms (approximately .5 oz.)
  • 3 cups hot water
  • 2 tablespoons olive oil, divided
  • 1 pound button mushrooms, sliced
  • 3 cups green beans (cut into 1 inch pieces)
  • 1/2 teaspoon black pepper, divided
  • 1/2 cup vidalia onion, minced
  • 1/2 cup white wine
  • 1/2 cup Parmigiano-Reggiano cheese, grated
  • 1/4 cup fresh flat-leaf parsley, chopped
  • 2 teaspoons fresh thyme, chopped

Directions:

  1. Bring a medium saucepan of water to a boil and add 1 teaspoon salt. Stir in rice.  Reduce heat and simmer for 15 minutes.  Drain and set aside. Note: Rice will not be done, this is ok.
  2. Place dried porcini mushrooms in a medium bowl.  Cover mushrooms with 3 cups hot water.  Let stand for 15 minutes. Using a sieve, drain over a bowl; reserve liquid. Chop porcini.
  3. Heat 1 tablespoon oil in a large skillet (with tall sides) over medium-high heat. Add sliced, fresh mushrooms.  Sauté for 8 minutes or until moisture evaporates and mushrooms begin to brown; stir occasionally.
  4. Stir in chopped porcini, green beans, 1/4 teaspoon salt, and 1/4 teaspoon black pepper.  Cook for 2 minutes or until the green beans are crisp-­tender. Place mushroom mixture in a large bowl and keep warm.
  5. Return skillet to medium-high heat.  Add remaining 1 tablespoon oil. Sauté onion for 4 minutes or until tender.
  6. Add rice to the skillet and cook for 2 minutes; stir occasionally. Add remaining 1/4 teaspoon salt and 1/4 teaspoon black pepper; combine well.
  7. Stir in wine and cook for 2 minutes or until the wine evaporates; stir constantly.
  8. Add 1/2 cup reserved mushroom liquid to rice mixture.  Stir constantly for 3 minutes or until the liquid is almost absorbed. Repeat until the mushroom liquid is gone (approximately 30 minutes total).
  9. Add grated Parmigiano-­Reggiano, parsley, and thyme; stir to combine well.  
  10. If desired sprinkle with additional Parmigiano-Reggiano cheese before serving.  Enjoy!

Related Posts Plugin for WordPress, Blogger...