Sunday, July 31

Garlic Ginger Salmon with Tangerine Sauce

Since I started my cooking blog I feel we’ve tested a lot of salmon recipes.  We’ve tried quite a few and it’s hard finding new recipes that are unique.   This happens to be one of those recipes.  The ‘tangerine sauce’ intrigued me, and I LOVE cilantro which happens to be one of the ingredients in this dish.
Before the salmon fillets are placed in the oven an olive oil mixture is created to cover the fillets.  If you have a food processor this will help blend the ingredients into a very fine paste.  I took the easy way out as I have a food processor but didn’t feel like getting it dirty (just one more thing to clean up!) and I always have a stock supply of minced ginger and garlic in the fridge.  Having pre-minced garlic and ginger is great because it saves a lot of time and you can buy it in small jars at any grocery store.  If you manually mix the ingredients by hand, like I did, it’s really simple.   Just make sure the cilantro is chopped very fine, as well as the garlic and ginger.  The mixture will be more liquid-like and can be easily spooned on top of the fish.  The only benefit I see in using a food processor is that the mixture would be more paste-like and would stay on top of the fillets better.

Olive oil mixture


Ready to put in the oven
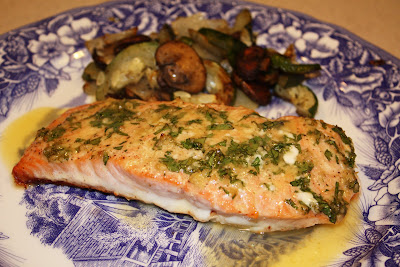
Once the fillets had 5 minutes left to cook I began making the tangerine sauce.  The original recipe calls for tangerine juice, however I didn’t want to buy a large bottle and have the remaining amount go to waste.  I decided to use regular orange juice instead.  The sauce is very easy to make and during the last few minutes it will become thicker as it’s simmering.  When the salmon has finished cooking, simply spoon the sauce over the fillets.

The salmon cooked well and I paired it with a side of roasted mushrooms, zucchini, and onions.  I first tried the salmon without the sauce and I thought it had a really unique flavoring.  I could have eaten it without the sauce but I wanted to try it and thought it complimented the salmon very nicely.  We both agreed that this meal has a much stronger fish taste than other salmon recipes we’ve tried. Ryan liked this dish but he still has his all-time favorite salmon recipe (Dry-Rubbed Salmon with Cucumber Relish). Overall I feel the ingredients make this a wonderful dish to serve in the summer.


Garlic-Ginger Salmon with Tangerine Sauce
Serves 2
Prep time: 10 mins.
Total time: 25 mins.

Ingredients:
  • 2 salmon fillets
  • salt
  • pepper
  • 1 tablespoon olive oil
  • 1 tablespoon fresh cilantro, chopped
  • 1 tablespoon fresh ginger (minced) or 1/2  teaspoon chopped ginger (packaged/sold in jar)
  • 2 garlic cloves, minced
  • 1/2 cup tangerine or orange juice
  • 1 teaspoon cornstarch
  • 1/2 teaspoon dried coriander
  • 1/2 tablespoon butter

Directions:
  1. Preheat oven to 400˚F.  Lightly grease a roasting pan with butter.
  2. Season salmon fillets with salt and pepper.  Place in prepared pan.
  3. Combine the oil, cilantro, ginger, and garlic.  Mix and mash by hand, or use a food processor.  Spread the mixture on top of the fillets.
  4.  Roast the salmon for 12 to 15 minutes or until the fish flakes apart easily with a fork.
  5. When the fish has 5 minutes left to cook, prepare the tangerine sauce. 
  6. In a small saucepan whisk together tangerine/orange juice, cornstarch, and coriander over medium heat.  Reduce to a simmer and add butter. 
  7. Simmer sauce for 3 to 5 minutes, allowing sauce to thicken.
  8. Drizzle sauce over fillets before serving.

Saturday, July 23

Coconut Chicken with Pina Colada Dip

I decided to search Food.com and see what kind of Weight Watchers recipes I could find because in the past we’ve made some that tasted really good.  And the best part is they’re healthier than a traditional dish we’d most likely make.  The below recipe happened to be posted in this section and I thought what a great summer dish!  When I saw the Pina Colada dipping sauce for the chicken, I was sold.

I ended up altering the original recipe by using Panko breadcrumbs instead of regular breadcrumbs.  I prefer them rather than breadcrumbs for certain dishes as they tend to have a lighter texture. Also, a tip for when you’re at the store buying ingredients.  There are containers of coconut milk that are found in the same aisle as the canned milk and Silk (almond milk,etc), but they’re too large.  However if you visit the international aisle in the Asian section you’ll find canned coconut milk that is just the right size.  The can I bought was just a little less than 14oz. and I’d much prefer that than having a bunch left over I wouldn’t know what to do with.


I would say this is more of a weekend meal as the chicken takes 1.5 hours to marinate.  It’s a long time but I think this is what really helps soak in the flavor.  I had a little disaster as I was mixing the marinade ingredients.  I used quart size Ziploc bag and stood it up on the count after I added the coconut milk.  I thought I’d add the chicken pieces to it slowly, but when I turned my back the bag fell over and spilled a good amount before I could catch it.  Lesson learned, always stand a bag up in a small bowl so that it can’t tip over. 

What’s nice is that while the chicken is marinating the coconut breading and the dip can be prepared.  The breading mixture is easy to assemble and what I found to work best is to mix all the ingredients in a bowl and then spread it onto a large plate.  This way, when the chicken is breaded, a spoon can be used to scoop and pat the mixture onto the chicken.


The dip is easy to create and should have enough time to chill before serving.  Unfortunately for the dip only a small amount of pina colada drink mix is needed and it’s sold in large bottles.  I thought for sure I could find a small bottle, but no luck at Meijer’s.  The good thing is that the mix can stay refrigerated.  I bought one of the large bottles on sale in hopes that we could make pina colada’s with friends one night and use the rest.  


When I read the original recipe one of the reviewers had a great idea…place a cooling rack on top of the baking sheet.  This helps cook the chicken evenly all over.  And it’s much easier than flipping the chicken pieces one by one half way through.  It also helps prevent the chicken from sticking to the baking sheet.  No PAM needed.  I hate using PAM and avoid it all costs as it’s really bad for your pans.

 
In the end we were quite impressed with this recipe.  When I took my first bite you can’t help but think of things such as summer, tropical, and beaches.   The coconut breading is not too thick and it has a nice light texture.  My husband who ate before class wasn’t planning on having dinner once he got home but decided to try a plate.  He loved it and even had a second serving!  There’s one thing I wasn’t expecting and that’s that the pina colada dip didn’t look the way I thought it would.  I thought it would have a thicker, creamy texture similar to sour cream but it’s more liquidy.  Either way, the flavor was still great!


Coconut Chicken with Pina Colada Dip
Serves 2-3
Prep Time: 1.5 hours
Total Time: 2 hours
Adapted from recipe #130707 by Redsie, food.com

Ingredients:
  •     1 tablespoon lime juice
  •     1 tablespoon hot pepper sauce (green or red Tabasco sauce)
  •     1 (14 ounce) can light coconut milk
  •     1 lb boneless skinless chicken breast (cut into bite size pieces)
  •     3/4 cup panko breadcrumbs
  •     1/2 cup sweetened flaked coconut
  •     1/2 teaspoon salt
  •     1/4 teaspoon ground pepper

Pina Colada Dip
  • 3 ounces crushed pineapple
  • 3 ounces fat free sour cream
  • 4 ounces pina colada drink mix (non alcoholic)

Directions:
  1. Preheat oven to 400°F.
  2. Combine first 3 ingredients in a Ziploc bag.  Add chicken and seal.
  3. Marinate in fridge for 1½ hours; turn bag occasionally.
  4. Prepare dip while chicken is marinating.  Combine all 3 ingredients and refrigerate.
  5. Combine panko breadcrumbs, coconut, salt, and pepper in a bowl. Stir well.
  6. Remove chicken from marinade.  Discard remaining marinade.
  7. Dredge chicken, 1 piece at a time, into panko mixture.
  8. Place a wire cooling rack on top of a baking sheet.  Arrange chicken pieces on top of the rack.
  9. Bake for 25-30 minutes.


Saturday, July 16

Soft Peanut Butter Cookies

So it was time to try a new cookie recipe for a friends birthday.  A friend who likes peanut butter cookies.  I’ve made peanut butter cookies in the past, however the last time I made them they had more of a hard, crunchy texture.  I wanted to find a recipe for soft peanut butter cookies. Think similar to a peanut butter cookie you’d get at Panera Bread (yum!).

I searched a lot of cookie recipes online and then I found the recipe below which even details ‘soft’ in its title.  I double checked the reviews just to make sure everyone agreed they lived up to their title of ‘soft’.  
The dough for this recipe is very easy to whip up and in no time you’ll be ready to put them in the oven. For these cookies, however, I wanted to experiment with a different design on top of the cookies.  All the homemade peanut butter cookies I’ve ever tried have ALWAYS had the same criss-cross fork pattern on top.  It’s so traditional that I find it a little boring.

So I dug through my kitchen drawers to see what kind of utensils I had that would make interesting patterns.  I came up with a potato masher, straws, a milk shake mixer attachment (in the picture it’s the metal rod with the white round attachment), and alphabet cookie cutters. I thought the alphabet cookie cutters would be awesome as you could make a great gift for someone; cookies with their initial.

Utensils to experiment with...


As I began testing the utensils on the dough balls, right off the bat, the straws did not work.  The dough got stuck inside.  The alphabet cookie cutters not so much either.  The cookie cutters just cut through the dough.  After the cookies baked you could only faintly see the letters.  I wouldn’t use these again, however, the potato masher and milk shake mixer attachment worked great!  They made a modern design as you can see in the pictures below.   My personal favorite was the milk shake mixer attachment.  It produced a unique pattern that looked similar to a flower.  

Roll in sugar


The patterns
When the cookies were done Ryan and I waited a few minutes and tried them while they were warm.  They were very tasty and very soft indeed.  Even after they were fully cooled they maintained a nice, soft texture.  I will definitely make these cookies again, especially now that I know how to liven them up with new designs.  If you decide to try making these, look around your kitchen and see what kind of utensils you have to make unique patterns.


Soft Peanut Butter Cookies
Adapted from Recipe #205890 by Lainey6605, food.com
Serves: 30 to 40 (makes approximately 40 cookies)
Prep Time: 10 mins.
Total Time: 45 mins.

Ingredients:
  • 1 cup creamy peanut butter
  • 1 cup packed brown sugar
  • 1 cup white sugar
  • 1 cup butter or margarine, softened
  • 2 eggs
  • 1 teaspoon baking soda
  • 1 teaspoon baking powder
  • 1 teaspoon vanilla extract
  • 2 1/2 cups flour

Directions:
  1. Preheat oven to 350˚F.
  2. Cream together: butter, peanut butter and sugars.
  3. Add eggs, one at a time, beating well.
  4. Add baking soda, baking powder and vanilla.  Stir in flour slowly.
  5. Roll into small balls.  Sprinkle white sugar onto a plate and roll dough ball through the sugar, coating entirely. 
  6. Slightly flatten dough balls by using a fork to create a traditional criss-cross pattern or use other kitchen utensils such as a potato masher for a different pattern.
  7. Bake on an ungreased cookie sheet for 6-7 minutes.

Saturday, July 9

Apple & Horseradish Glazed Salmon

When I saw the name of this recipe I think my first thought was eww, horseradish?  But then I realized the apple jelly and horseradish combined must balance each other out and make a nice combination.  I really wanted to try it as I couldn’t imagine what the salmon would taste like.

There’s very few ingredients for this recipe.  I didn’t have apple jelly at home so I purchased some at Meijer’s.  I searched the jelly aisle and found that Smucker’s does not make apple jelly, which I found kind of surprising. Either that or Meijer’s didn’t carry it.  Luckily Meijer’s has their own brand of jelly and they happened to have apple.  Who knew apple was such an uncommon flavor!  


While at the store I also purchased horseradish.  I’ve never bought horseradish so I didn’t even know where to find it at the store.  I thought it would be down the salad dressing/condiments aisle but when I couldn’t find it, the store associate guided me to the refrigerated cheese section and it was next to the cream cheeses. 

The apple glaze mixture


Keep in mind one of the ingredients for this recipe is chives.  I highly recommend using fresh versus dried chives.  You can find these at any grocery store OR you can plant your own.  The ones I used for this recipe are compliments of my friend, Jenny Maywood.  A few years ago she gave me chives from her garden to plant.  Over time they even spurt little purple flowers that blossom, which I thought was really cool.  What’s really nice about chives is that they come back every year and spread too.  I originally had them in our garden on the side of the house, but this year I transferred them to a pot that I keep on my patio so I can easily cut them whenever I need any.  Jenny started a really cool blog called Gemazon (check it out!!!).  She has inspirational and motivating posts on how to stay fit, or become fit for those of us who aren’t.  There’s even healthy recipes intermixed along the way.

What’s really nice about this recipe is that it doesn’t take long to make.  After the salmon has cooked in the skillet for a few minutes, the skillet handle is wrapped in foil and put in the oven to bake.  I’ve never made any dishes where the skillet is transferred to the oven, but I’ve heard you can do this as the foil will protect the handle.  When I pulled the skillet out, everything was in one piece and the handle was perfectly fine after the foil was removed.

In the end, both Ryan and I liked this dish.  We felt it was another good salmon recipe to add to our collection, however we agreed it wasn’t one of our ‘over the top’ salmon recipes like Dry Rubbed Salmon with Cucumber Relish, Chili Garlic Glazed Salmon, or Salmon with Honey Mustard Glaze (previously featured).  The apple jelly and horseradish balanced each other out as I suspected.  You couldn’t taste each flavor individually, but instead tasted a nice sweet flavor.


Apple & Horseradish Glazed Salmon
Adapted from The Best of Cooking Light Everyday Favorites: Over 500 of Our All-Time Greatest Recipes, by the Editors of Cooking Light Magazine (Amazon affiliate link)
Serves:2
Prep Time: 5 mins.
Total Time: 15 mins.

Ingredients:
  • 1/3 cup apple jelly
  • 1 tablespoon chives, finely chopped
  • 2 tablespoons prepared horseradish
  • 1 tablespoon white wine vinegar
  • ½ teaspoon kosher salt (divided)
  • 2 large salmon fillets
  • ¼ teaspoon black pepper
  • 2 teaspoons olive oil
 Directions:
  1. Preheat oven to 350˚F.
  2. Combine the following ingredients:  apply jelly, chives, horseradish, vinegar, ¼ teaspoon salt; stirring well with a whisk.
  3. Sprinkle salmon with ¼ teaspoon salt and pepper. 
  4. Heat oil in a large nonstick skillet over medium heat.   Add salmon and cook 3 minutes.
  5.  Turn salmon over, brush with half of apple mixture. 
  6. Wrap skillet handle in foil and bake for 5 minutes or until fish flakes easily when tested with a fork.  Brush with remaining apple mixture. 

Friday, July 1

Cheesecake Stuffed Strawberries

I found this recipe online a while back and I thought it was such a unique idea.  Everyone loves chocolate covered strawberries so what about adding a twist?  Cheesecake filled strawberries topped with chocolate or nuts!  Since then I’ve made this recipe for quite a few parties as it’s simple to make and looks fancy.

The recipe below is for a large amount of strawberries.  The original recipe states it will produce 24 strawberries, however EVERY time I make it, I always wish I had halved the cheesecake filling.  But I never remember!  I find that recipe a little misleading so I updated the below recipe to the correct quantity it produces (as well as made some adjustments to the cheesecake filling based on others reviews).  Just remember to half the ingredients if you want a smaller amount.  I ended up making around 25 total.  Also remember that the size of your strawberries will affect how much you produce.  For this dish I recommend buying larger strawberries as it’s easier to assemble them.  


You’ll find hulling the strawberries is what takes the longest amount of time in putting these together.  I use a sharp knife to cut the stem and slightly carve out the inside.  This tip is optional:   use a paper towel to put over your finger and press/turn inside the strawberry to dry out the inside.  It’s something new I tried this time and found it helps preserve the cheesecake so that it doesn’t become runny while it sits inside the strawberry.
What the inside should look like after it's hulled
After the strawberries are hulled, chop up the toppings you’re going to use.  So far I’ve used chocolate, almonds, and pistachios.  I think all of them taste great, so be creative!  I don’t think anything would taste bad on top of these.  When you’re ready to fill the strawberries use a small spoon such as a baby or appetizer spoon.  These will make it easier to stuff the cheesecake inside.  Fill the cheesecake right to the top of the strawberry and then dip into the topping.  

Chopped toppings


What I typically do is make these right before a party so that they’re fresh and haven’t been sitting too long.  Two hours before hand should be plenty of time to make them as well as let them cool in the fridge.  Make sure you try one before they’re served because they’ll go fast!


Cheesecake Stuffed Strawberries
Adapted from recipe #216350 by Linda's Busy Kitchen, food.com
Serves: 48
Prep time: 45 mins.
Total time: 45 mins.

 Ingredients:
  • 48 large strawberries, hulled
  • 12 ounces cream cheese, at room temperature
  • 1 1/2 teaspoons vanilla
  • 6 tablespoons confectioners' sugar
  • Chopped toppings (suggestions: chocolate, almonds, pistachios)


Directions:
  1. Place cream cheese in a bowl and microwave for approximately 30 seconds or until it's soft.
  2. Whip together: cream cheese, vanilla, and sugar.
  3. Use a sharp knife to hull the strawberries.  The hole inside the strawberry should be as deep as you can go without cutting through the bottom.
  4. Spoon or pipe the filling into each strawberry.
  5. Dip the cheesecake end of the strawberry into chopped toppings.  Make sure to completely cover the cheesecake filling with the nuts.
  6. Chill and serve.

Related Posts Plugin for WordPress, Blogger...