Monday, February 20

Thai Chicken Pizza

What American doesn’t love pizza?  I think it’s funny that whenever my mom visits  my husband and I, and we ask her what she wants to eat for dinner, she responds by saying let’s order pizza!  She loves pizza.  I think she could eat it every day and not get tired of it.  I love pizza too, but over the years my taste has changed.  When I was young I used to love Pizza Hut's deep dish pizza.  When my husband and I were dating we would order Papa John’s deep dish or Domino’s thin crust pizza.  And since we moved to Whitmore Lake we’ve found there aren’t many pizza chains that are nearby.   There’s a new, family owned pizza joint (Mickey’s Pizza) that has become our favorite, but many nights we decide to make our own pizza.
 
Making pizza at home is quite simple and I think you’ll prefer the taste.  Not only can you customize it to your liking (heavy sauce, light cheese, extra pepperoni, etc.) but you can use fresh ingredients as well.  You can take the easy route and buy pre-made dough (brands such as Boboli, etc) or you can make your own from scratch.  Making your own pizza dough from scratch is not hard at all.  If you’re making pizza during the week, after you get home from work, you will most likely find that you want to eat ASAP and not wait 30 minutes or more for the dough to rise.  I always find myself in this situation so instead I buy a dough mix (Martha White’s Deep Pan Pizza Crust Mix) and simply add water and oil.  Only 5 minutes!

I guarantee if you try making your own pizza, you’ll love it.  And it only takes approximately 10 minutes to bake.  That’s faster than frozen pizzas you can buy at the store!  Once you master making your own pizzas you’ll want to experiment with toppings.  That’s how the recipe below originated.  While my husband and I were in England, this past Fall, I ordered chicken Thai pizza for dinner one night.  I had never heard of such a pizza, but knew from the toppings I would love it.  This 
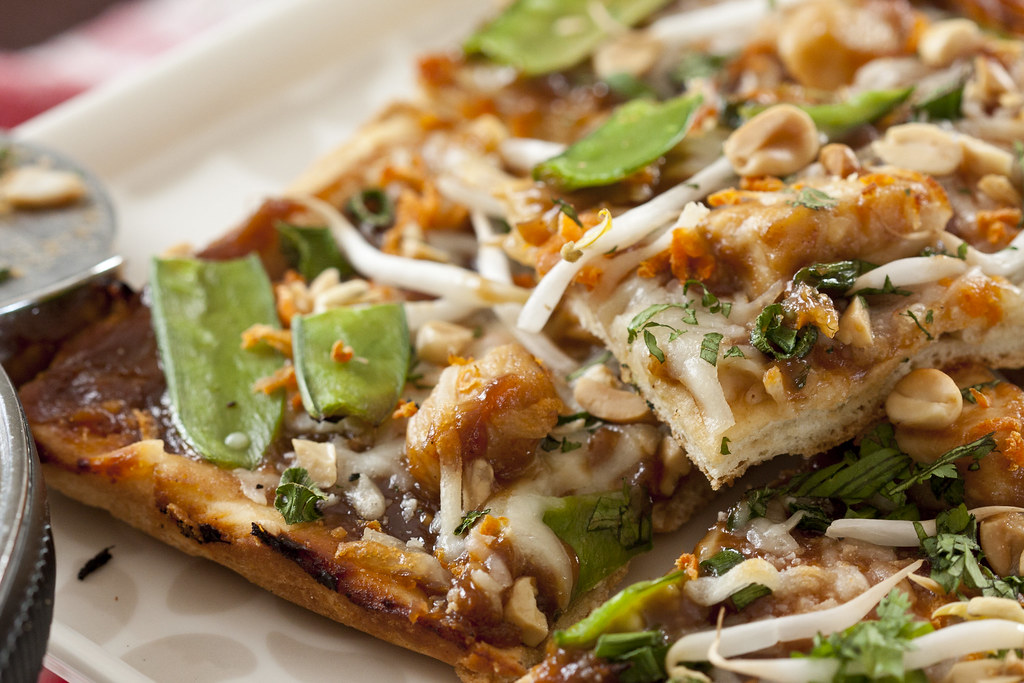
is definitely not your traditional pizza.  It’s made with a Thai peanut sauce and topped with chicken, shredded carrots, snow peas, bean sprouts, roasted peanuts and cilantro.  I was mesmerized after I took my first bite.  It was soooo good. 

I knew I wanted to make this when we returned home and the recipe below is just that.  I’ve made some modifications to the original recipe, but I also noticed that the reviewers said it tastes very similar to California Pizza Kitchen’s Thai Chicken Pizza.

If you’re like me, there’s a few ingredients below that you may not have readily available at home.  For instance, oyster sauce.  You can find oyster sauce and hoisin sauce in the Asian section at your local grocery store.  Kikkoman is a widely known brand for soy sauce and I discovered that they also make oyster sauce.  You’ll also see that fresh ginger is used in making this sauce.  If you’ve never worked with fresh ginger, don’t let it scare you.  You can find ginger root sold in the produce department.  To cook with it simply break off one of the knubs, use a spoon or vegetable peeler to remove the skin, and mince it.   I found this short video tutorial quite helpful.  Also, the smell of fresh ginger is like no other.  It’s absolutely refreshing!  And if you cut too much, make sure to put the rest down your garbage disposal so that its exhilarating aroma can take care of any lingering smells. 

Fresh ginger


Watch out!  There's a new pizza sauce in town!

When the pizza finished baking, I could barely wait to dig in.  I took my first bite and WOW, it was amazing!  Just like the pizza I had in England!  The peanut sauce is absolutely addictive.   Not only do you have a wonderful sauce that is new to your palette, but you also have the crunch of snow peas and beans sprouts exploding like fireworks in your mouth.  This pizza was out of this world!  One of my favorite pizzas is barbeque chicken pizza, but I have to say that this is my new, all time favorite pizza.  And what I love about this pizza is that it’s so unique.  I’m already planning to make it and serve small slices as an appetizer at my next party.  Try this pizza, you will not be disappointed!


Thai Chicken Pizza
Adapted from recipe# 62778 by Kimke, food.com
Yields: 2 medium pizzas
Prep time: 25 mins.
Total Time: 40 mins


Ingredients: 

Thai Peanut Sauce
  • 1/2 cup peanut butter
  • 1/2 cup hoisin sauce
  • 1 tablespoon honey
  • 2 teaspoons red wine vinegar
  • 2 teaspoons minced ginger
  • 1 teaspoon minced garlic
  • 2 tablespoons sesame oil
  • 2 teaspoons soy sauce
  • 1 teaspoon chili sauce
  • 1 tablespoon oyster sauce
  • 2 tablespoons water

Thai Chicken
  • 1/2 tablespoon sesame oil
  • 1 boneless, skinless chicken breast (approximately 10-10.5 oz.), cut into 1/2 inch cubes  

Pizza Toppings
  • 2 pizza dough, buy pre-made or a package mix (such as Martha Whites Deep Pan Pizza Crust Mix)
  • 2 cups shredded mozzarella cheese
  • 4 scallions, sliced diagonally
  • 1/2 cup white bean sprouts
  • 1/2 cup shredded carrots
  • 1/2 cup snow peas
  • 4 tablespoons roasted peanuts, chopped
  • 2 tablespoons fresh cilantro, chopped 

Directions:
  1. If using dough mix (vs. pre-made pizza crust), follow instructions on the package to assemble dough.  Cover and set aside in a warm place such as the microwave. 
  2. In a small pan over medium heat combine all sauce ingredients.  Stir and bring to a boil.  Reduce to low heat and simmer for 2 minutes.  Set sauce aside.
  3. Trim ends off snow peas and cut pods in half.  In a small pot or skillet, add 1 tablespoon water and steam the snow peas over medium heat.  Remove when peas are crisp/tender and water has evaporated (approximately 2-3 minutes).
  4. Pre-heat oven to 450˚F.
  5. In a small skillet heat 1/2 tablespoon sesame oil over medium heat.  Add chicken pieces and cook until no longer pink inside (approximately 5-6 minutes total). 
  6. Remove chicken and place in a medium bowl.  Add 1/4 cup sauce; stir until all pieces are evenly coated.  Set aside.
  7. Lightly drizzle olive oil over 2 small to medium sized baking sheets (round or rectangular); use a cooking brush to spread evenly. Press and shape dough into each pan.
  8.  Bake dough for 3 to 4 minutes; just long enough for the dough to slightly harden (this will ensure no soggy pizza!). Remove and begin to assemble the pizzas.
  9. With the remaining sauce, divide between each pizza; spread evenly over the dough with the back of a spoon.   
  10. Top each with pizza with 3/4 cup cheese.  Add and evenly distribute the chicken pieces, green onions, shredded carrots, and snow peas.
  11. Sprinkle the remaining cheese (1/2 cup) over each pizza and their toppings.  Sprinkle the chopped peanuts, evenly, over the pizzas. 
  12. Bake for 9-11 minutes or until the cheese begins to bubble. 
  13. Remove from the oven and top with bean sprouts and cilantro.
  14. Slice and serve!

Sunday, February 12

Heart Shaped Chocolate Chip Pancakes

Valentine’s Day is right around the corner.  Girlfriends and wives always look forward to this day.  Roses, frilly heart shaped boxes of chocolate, champagne, fancy dinners, diamonds, and the list goes on.  Can you blame them?   Even if your guy isn’t romantic this may be the one time of year that he is.  And let’s face it, this is a holiday that’s more for women than men.  In other words a guy’s gift for his lady will be judged much more than a girl’s gift will be for her guy.  I think that’s why so many guys hate Valentine’s Day (and Sweetest Day).  It’s frightening to think about all the pressure to make it perfect.

I have to say over the years I’ve been that lucky girl who’s spoiled by her boyfriend (now husband).  I’m sure all his friends will tease him if they keep up with my blog, but I can honestly say, hands down, that I have the most romantic and thoughtful husband in the world.  One of my favorite Valentine’s Day memories is when we celebrated our first Valentine’s Day together as a married couple.  We were out to dinner and he surprised me with a little box.  I definitely was not expecting jewelry considering we had just celebrated our wedding a few months earlier.  But inside the box was a beautiful, antique, gold cameo locket necklace.  Why was it so special to me?  I’ve ALWAYS wanted an antique cameo necklace.  I had seen them at antique stores and always thought I’d buy one for myself someday.  Well he remembered this from years past and bought me one! 

My cameo locket

Or there was the Valentine’s Day when we were dating and he made me breakfast in bed with heart shaped, chocolate chip pancakes that were absolutely delicious!  I found out months later that he practiced making them during the week so they’d turn out just right that day (seriously how did I get this lucky?!).

Cook the pancake inside of the cookie cuter - Make sure to sprinkle with chocolate chips!

The true meaning of Valentine’s Day isn’t about gifts, it’s about making your loved one feel special and know how much you appreciate them.  To this day those heart shaped pancakes are still engraved on my brain.  That’s why I wanted to share this post with you.  This is a simple way you can show your sweetie how much you love them.  Everyone can make pancakes (Bisquick please!) and with the right tools (a large heart shaped cookie cutter) you can make these decadent, heart shaped, chocolate chip pancakes.  And ladies if you’re making these for your guy who doesn’t have a sweet tooth, simply substitute banana slices for the chocolate chips.  And remember, if you don’t have time to celebrate during the week (Valentine’s Day falls on Tuesday this year) then wait and celebrate the following weekend like we’re doing.  Whatever you do, enjoy it, and spoil your loved one with love.


Heart Shaped Chocolate Chip Pancakes
Original recipe by Alissa Hebert
Serves: 4
Prep Time:  5 mins.
Total Time:  20 mins.

Ingredients:

Tools Needed:

Optional:
  • confectioners sugar

Directions:
  1. Make pancake batter by following directions as stated on box of pancake mix. 
  2. Add an additional 1/4 cup of water (this will make the batter easier to spread).  Stir until well combined.
  3. Pre-heat a large skillet over low-medium heat.  Spray inside and outside edges of the heart cookie cutter. 
  4. Place cookie cutter in pre-heated pan and allow to heat for 30 seconds. 
  5. Pour batter into cookie cutter.  Quickly sprinkle chocolate chips on top of batter.
  6. Cover skillet with lid and cook for approximately 1 minute.  Remove lid and use tongs to carefully remove the cookie cutter (use caution as the cookie cutter will be hot).
  7. Using a spatula, flip the pancake cover and cook until the bottom is cooked.
  8. If desired lightly sprinkle with confectioners sugar for an extra nice treat!  Note: this is also a good way to cover any blemishes.

Friday, February 10

Taco Scoops

Are you ready for some football?!!!!! This past weekend not only did we celebrate traditional Sunday Super Bowl, but we also celebrated Madden Fest.  Yes, my husband and his friends have a Madden football league.  He even made it to the Final Four with his team!   There were big stakes on the line this year:  money, bragging rights, and yes a very large trophy with the winners name to be engraved.  Of course I wanted my hubby to win, but secretly I was praying that we wouldn’t be taking home the ‘beautiful’ trophy.   

Imagine my dilemma of deciding what to make for 2 Super Bowl parties!  Sure, the game is on TV, but what matters most to me are the commercials and snacks.  LOTS of snacks.  But if you’re going to a party you need to think outside of the box because everyone always brings a dip.  So what to make?  I decided for Super Bowl Sunday that I would make my Mini Boston Cream Pies since there probably wouldn’t be a lot of sweets.  But for Madden Fest I made one of my most popular appetizers….Taco Scoops.

The key ingredient - Tostitos Scoops

A lot of friends and family members reach out to me and ask if I can recommend any good appetizer recipes.  Well this is it!  This is THE one!  Not only is it easy, but they taste absolutely delicious!

Why do people love these appetizers so much?  1. Who doesn’t love tacos?  2.  Who doesn’t love tacos that aren’t messy?  That’s the beauty of this recipe.  The filling is simply taco meat and cheese.  But how do these transform into an elegant appetizer that’s not messy?  Tostitos Scoops.  The meat mixture is spooned into the Tostitos Scoops, sprinkled with cheese, and baked in the oven.  When they come out they’re topped with a dollop of sour cream that has been mixed with taco seasoning.  

The final stats!


Madden Fest 2012 Champion - Kevin Klockziem

Our guests tried these for the first time after one true Madden champion remained (congrats Kevin Klockziem!).   I made half a batch and in minutes these were gone and I quickly put another round in the oven.  The guys loved them!  These make for the perfect appetizer because they’re bite sized and contained in the scoop. No mess! 


Taco Scoops
Serves:  80-90 scoops
Prep Time: 20 mins.
Total Time: 30 mins.

Ingredients:
  •     1 lb. ground beef
  •     1 (1.25 oz.) package taco seasoning, divided
  •     1/3 cup water
  •     1 cup mexican blend cheese, divided
  •     1 cup chunky salsa
  •     1 bag Tostitos Scoops
  •     1 (8 oz.) container sour cream

Directions:

  1. In a large skillet cook ground beef over medium-high heat; break the meat up into small pieces.  Strain and drain grease.
  2. Pre-heat oven to 350˚F. Mix sour cream and half the package of taco seasoning; return to the fridge.
  3. Return meat to the skillet and add the remaining amount of taco seasoning and water. Continue cooking until the water has evaporated.
  4. Add salsa and 1/2 cup Mexican cheese to the meat mixture. Stir until the cheese has melted.
  5. Spoon meat mixture into Tostitos Scoops.  Place on a baking sheet and sprinkle remaining cheese over taco scoops.  Bake for 5 minutes.
  6. Use a spoon to top with a small dollop of the sour cream mix.

Wednesday, February 1

Spinach Salad with Salmon & Dried Cherries

My husband and I have our favorite restaurants and many times we find ourselves in a routine of frequenting the same places for dinner.  It’s hard to try new places when your favorites have the meals you crave and they’re cooked just right.   It just so happens that one night, while in downtown Brighton, we decided to try a new restaurant called the Brighton Bar & Grill.  The atmosphere inside was nice, but as we sat down at our table and began to look at the menu, I wished we had chosen somewhere else.  The dishes were priced higher than what I wanted to spend for dinner, and in all honesty I was in a picky mood, and none of the dishes jumped out at me.  

Then I came across the Salmon Raspberry Walnut Salad.  What?!  I love salmon and this salad sounded very intriguing.  Listed on the menu were its ingredients:  walnuts, dried Michigan cherries, crumbled bleu cheese, red onions, and raspberry vinaigrette.  I was hooked when I read that it included salmon and dried cherries.   I decided to order it and hoped that it was as good as it sounded. 


When my salad arrived, my mood immediately changed after taking my first bite.  I couldn’t believe we had waited this long to try the Brighton Bar & Grill!   My salad was phenomenal!  The salmon was cooked wonderfully, the nuts added a nice crunchy texture, and the sweetness from the dried cherries made this the perfect combination.

The salad was so good that I was determined to make my own version at home.  I altered a few ingredients to our liking, such as using spinach instead of lettuce and pine nuts in place of walnuts.  I also found a wonderful raspberry vinaigrette at the store called Annie’s Naturals Raspberry Vinaigrette that pairs perfectly with this salad.  Store bought vinaigrette tastes nice, but if you have the time, making your own is not hard at all.  I have an amazing recipe for raspberry vinaigrette that can be made in as little as 10 minutes! 


This salad is so easy to make and it tastes refreshing.  I remember the first time I made it for my husband and I.  He had come from snowboarding and was excited for dinner until I announced we were having salad.  I actually saw his face sink.  Then he had his first bite and could not stop talking about how good it was!  Since then, he’s told me this is one of his favorite meals that I serve.  Not only that but he also suggested we should make this salad at least once a week.  WOW, I didn’t think it would go over that well!


Spinach Salad with Salmon & Dried Cherries
Original recipe by Alissa Hebert
Serves:  2
Prep Time: 10 mins.
Total Time: 22 mins.

Ingredients:
  • 2 (4-6 oz.) salmon fillets
  • 4 cups fresh baby spinach
  • 1/2 cup dried cherries
  • 1/2 teaspoon olive oil
  • 1/4 cup red onion, thinly sliced
  • 3 tablespoons pine nuts
  • 2 tablespoons feta cheese
  • lemon & pepper seasoning salt
  • salt
  • pepper

Directions:
1.   Pre-heat oven to 400˚F.
2.   Line a baking pan with foil.  Lightly grease foil with butter.
3.   Place fish fillets on top of foil.  Drizzle olive oil on top of fillets and use a cooking brush to spread across the sides and top.  Lightly sprinkle with lemon & pepper seasoning salt, as well as salt and pepper. 
4.   Bake fillets for 10 to 12 minutes or until the fish flakes apart easily with a fork.  Place fish on a plate and keep warm.
5.   Turn oven to broil mode (leaving at 400˚F).  Using a sheet of foil, create a small rectangle with raised sides (see picture above for example).  Place on baking sheet and add pine nuts inside.  Broil for 2 to 3 minutes or until nuts begin to turn golden in color.
6.   Divide spinach between two plates.  Top with red onion, feta cheese, dried cherries, and toasted pine nuts.  Place fillets on top of salad and serve with raspberry vinaigrette.

Related Posts Plugin for WordPress, Blogger...